Wednesday, January 28, 2015
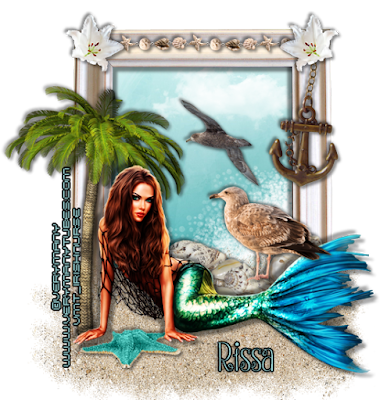
Rissa's Designs ~ Oceana

This tutorial is of my own creation and any resemblance, or likeness, to any other tut is purely coincidental. This tutorial is for personal use only; any use for monetary gain is illegal.
Supplies:
Program: Photoshop Elements 9 (other versions may work)
Tube of choice: Mermaid by VeryMany. You must have a license to use her tubes.
PTU Kit: Oceana by Rissa's Designs
Font: Strawberry Whipped Cream
Open:
RD_O_Paper14
RD_O_element32
RD_O_element6
RD_O_element10
RD_O_element11
RD_O_element36
RD_O_element41
RD_O_element46
RD_O_element52
RD_O_element59
RD_O_element73
RD_O_element77
RD_O_element78
Tutorial:
Create a new canvas ~ 521 x 549
RD_O_Paper14
RD_O_element32
RD_O_element6
RD_O_element10
RD_O_element11
RD_O_element36
RD_O_element41
RD_O_element46
RD_O_element52
RD_O_element59
RD_O_element73
RD_O_element77
RD_O_element78
Tutorial:
Create a new canvas ~ 521 x 549
RD_O_element32: paste onto new canvas
RD_O_Paper14: place behind frame and re-size to inside frame and crop if need be
RD_O_element77: re-size to 176 x 211 and crop out any that sticks past the frame --> place to the lower left inside the frame
RD_O_element52: re-size to206 x 99 --> place upper center of the tag
RD_O_element11: re-size to 120 x 130 --> place in center of the sky slightly overlapping element 52 (clouds)
RD_O_element77: re-size to 306 x 36 --> place on upper portion of the frame in the center
RD_O_element46: re-size to 476 x 144 --> duplicate x2 --> move all 3 layers where you want them (mine are above the frame and below the tube to make it look like she's laying on the sand some)
RD_O_element73: re-size to 152 x 68 --> place on bottom left of canvas
RD_O_element10: re-size 110 x 225 --> place on right side of frame (like a charm on a phone)
RD_O_element36: re-size to 93 x 92 --> place in the right upper corner of frame above the seashells over element10 (anchor) --> duplicate --> mirror --> place on the left corner of the frame
Tube of choice: re-size to your liking --> place in front of frame towards the bottom --> duplicate --> overlay on the duplicate layer
RD_O_element59: re-size 323 x 146 --> place behind tube --> make sure it's sticking out some
RD_O_element41: image --> rotate --> flip horizontal (or mirror) --> re-size 260 x 359 --> place on left side of frame behind the tube
RD_O_element6: re-size 181 x 143 --> place above tube on top of the seashells
Add your tube of choice
Add drop shadow to your liking (I used PSP X5)
Name:
-Photoshop Elements 9
-Font of choice (mine is Strawberry Whipped Cream so these settings work for my font. you may need to alter slightly for yours)
-layer --> layer style --> style settings
drop shadow: 30 deg angle; 5, 5, 75%; black
stroke: 2, 100, black
Add copyright and watermark
DONE

Tuesday, January 27, 2015
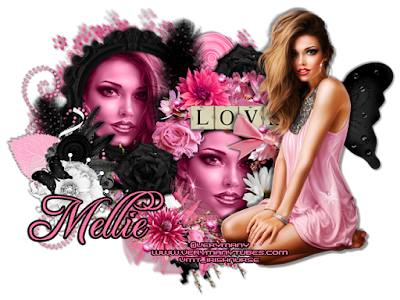
Mellie Beans ~ Definitely Girlie, Definitely

Supplies:
Program: Photoshop Elements 9 (other versions may work)
Tube of choice: Margaret by VeryMany. You must have a license to use her tubes.
PTU Kit: Definitely Girlie, Definitely by MellieBeans at Heartbeatz Creationz or Mystical Scraps
Open:
fr01
pp01
cluster01
e02
e34
e36
e37
e38
e40
e42
e48
e49
Tutorial:
Create a new canvas ~ 650 (w) x 488 (h)
fr01
pp01
cluster01
e02
e34
e36
e37
e38
e40
e42
e48
e49
Tutorial:
Create a new canvas ~ 650 (w) x 488 (h)
fr01: re-size 249 (w) x 246 (h) --> move to upper left --> duplicate --> move diagonally down to the right
pp01: magic wand tool --> select inside both frames --> select--> modify --> expand --> 5 pixels --> ctrl. + shift + I --> select the paper --> delete
tube of choice: mirror --> place above paper & behind frame --> select inside the frame on the left --> modify --> expand --> 5 pixels --> ctrl. + shift + I --> select the tube --> delete --> repeat for the other tube in the 2nd frame
e36: place behind frames and paper to the left
e40: re-size 156 (w) x 225 (h) --> place on the left frame to the left middle of the two frames
e02: re-size 97 (w) x 84 (h) --> place towards the bottom of e40 (feather)
e37: rotate --> custom --> 135 right --> re-size 139 (w) x 184 (h) --> place on right side of the right frame in the middle of the curve
e49: re-size 282 (w) x 215 (h) --> place on the top part of the right frame
e48: rotate --> custom --> 30 right --> re-size 311 (w) x 258 (h) --> place at the bottom of the right frame near e37
cluster01: rotate --> 90 deg left --> re-size 205 (w) x 307 (h) --> place to the bottom left of the left frame near e48
e38: re-size 114 (w) x 110 (h) --> place above the e48 layer and directly on top of the circle with secret written on it --> duplicate --> hide duplicate layer for now
tube of choice: re-size to your liking --> place on the right side of the tag --> filter --> xero --> radiance (use settings below or adjust to the way you want it)
e34: re-size 97 (w) x 94 (h) --> paste below the frames & to the right of the feather
e38: unhide duplicate layer --> move below the frames, above e34, & to the right some
e42: rotate --> custom --> 30 left --> re-size 189 (w) x 188 (h) --> place behind tube on upper back --> crop what you need for it too look like your tube has wings
Add drop shadow to your liking (I used PSP X5)
Name:
-Photoshop Elements 9
-Font of choice (mine is Freebooter Script so these settings work for my font. you may need to alter slightly for yours)
-layer --> layer style --> style settings
drop shadow: 30 deg angle; 3, 3, 75%; black
stroke: 3, 100, black
Add copyright and watermark
DONE

Subscribe to:
Comments
(Atom)


