My Sites
Forums


Monday, January 6, 2014
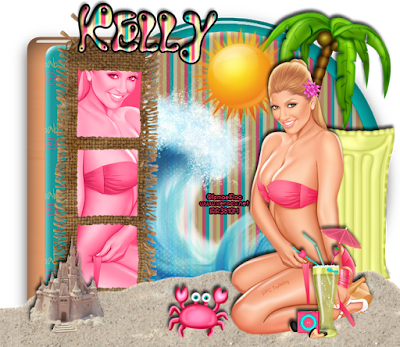
Evol Angel Scrapz ~ Sweet Summertime
This
tutorial is of my own creation and any resemblance, or likeness, to any
other tut is purely coincidental. This tutorial is for personal use
only; any use for monetary gain is illegal.
Supplies:
Program: Paint Shop Pro X5 (other versions should work) and Photoshop Elements 9 (for name & copyright)
Plugins: Alien Skin Eye Candy 5: Impact - bevel and glass *optional*
Plugins: Alien Skin Eye Candy 5: Impact - bevel and glass *optional*
Tube of choice: 2013 Tropical Beauty by Ismael Rac. You must have a license to use his tubes.
PTU Kit: Beach Baby by Evol Angel Scrapz
Template: 259mpm from Millie's PSP Madness
Font: Water Park
Tutorial:
-Open template. Shift D. Close original. Delete credits, layers 7 and 8. Merge layers 5 and 6 (orange squares).
Red Circle: open paper 6 --> selections --> select all
Red Circle: open paper 6 --> selections --> select all
Go
back to the template. Select the layer with the red circle:
selections --> select all --> float --> defloat --> inverse--> paste paper --> delete
Yellow Rectangle: open paper 9 --> selections --> select all
Go
back to the template. Select the layer with the yellow rectangle:
selections --> select all --> float --> defloat --> inverse--> paste paper --> delete
Red Rectangle: open paper 1 --> selections --> select all
Go
back to the template. Select the layer with the red rectangle:
selections --> select all --> float --> defloat --> inverse--> paste paper --> delete
Orange Squares: open paper 10 --> selections --> select all
Go
back to the template. Select the layer with the orange squares:
selections --> select all --> float --> defloat --> inverse--> paste paper --> delete
Green Circle: open paper 11 --> selections --> select all
Go
back to the template. Select the layer with the green circle:
selections --> select all --> float --> defloat --> inverse--> paste paper --> delete
-Open tube of choice --> re-size to your liking --> move to the right side of the tag --> duplicate tube layer --> flip horizontally --> move to the left side under frame 2
-Open Wave --> copy+paste onto tag --> move above the circle layer with the striped paper
-Open Floatie --> re-size 45% --> copy+paste onto tag --> move to the right side under the tube
-Open Palm Tree --> re-size 65% --> copy+paste onto tag --> move to the right side under the tube
-Open Sand --> copy+paste onto tag --> move to the right under the tube --> duplicate sand layer --> move over towards the left side
-Open SandCastle --> re-size 35% --> copy+paste onto tag --> move to the left side above the sand
-Open Sun --> re-size 35% --> copy+paste onto tag --> move to the top center
-Open Cocktail --> re-size 40% --> copy+paste onto tag --> move to the right side above tube
-Open Mini iPod --> re-size 15% --> copy+paste onto tag --> move to the right side above tube
-Open Crab --> re-size 25%
Name:
-Photoshop Elements 9
-Font of choice (mine is Water Park so these settings work for my font. you may need to alter slightly for yours)
-layer --> layer style --> style settings
drop shadow: -68 deg angle; 5, 5, 75%; black
bevel: 5
stroke: 3, 100, black
Pattern: Paper 12
-selections --> select all --> copy --> paste onto tag --> deselect --> re-size over name -->selections --> select all --> float --> defloat --> inverse--> paste paper --> delete
Pattern: Paper 12
-selections --> select all --> copy --> paste onto tag --> deselect --> re-size over name -->selections --> select all --> float --> defloat --> inverse--> paste paper --> delete
Add copyright and watermark
DONE

Subscribe to:
Post Comments
(Atom)
My Blinkies
0 comments:
Post a Comment